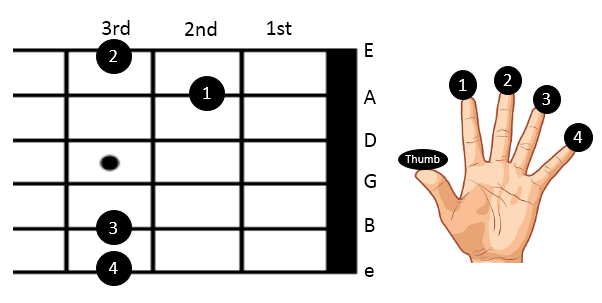
Here are some tips to help you master the G chord on the guitar:
1. Finger Placement:
- Index Finger: Place it on the 2nd fret of the 5th (A) string.
- Middle Finger: Place it on the 3rd fret of the 6th (E) string.
- Ring Finger: Place it on the 3rd fret of the 2nd (B) string.
- Pinky Finger: Place it on the 3rd fret of the 1st (high E) string.
2. Proper Hand Positioning:
- Keep your thumb behind the neck of the guitar to maintain good leverage.
- Curve your fingers to avoid muting any adjacent strings accidentally.
3. Strumming Technique:
- Strum all six strings when playing the G chord.
- Ensure each string rings clearly by adjusting your finger placement if necessary.
4. Practice Switching Chords:
- Practice transitioning from the G chord to common chords like C, D, and Em. This will help build muscle memory and improve your overall playing.
5. Use Variations:
- Experiment with different variations of the G chord, such as the G7 or Gsus4, to add more variety to your playing.
6. Start Slow:
- When learning the G chord, start slow and focus on accuracy. Gradually increase your speed as you become more comfortable.
7. Check for Clean Sound:
- Play each string individually after forming the G chord to ensure that every note rings out clearly without any buzzing or muting.
8. Incorporate Into Songs:
- Practice the G chord in the context of songs you enjoy. Many popular songs use the G chord, making it a great way to reinforce your learning.
9. Stay Relaxed:
- Keep your hand and wrist relaxed while playing to avoid tension, which can lead to discomfort or mistakes.
10. Regular Practice:
- Consistent practice is key. Spend a few minutes each day working on the G chord to build confidence and improve your skill over time.
These tips will help you master the G chord and use it effectively in your guitar playing.

7 thoughts on “Guitar Basics: How to Play the G Chord Easily”