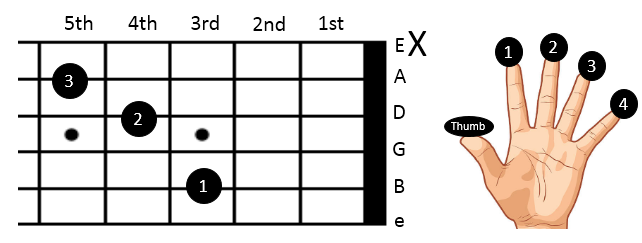
Dadd11 Chord:-
Place your 1st(index) finger on the third fret of the second string,
your 2nd(middle) finger on the fourth fret of the fourth string, and
your 3rd(ring) finger on the fifth fret of the fifth string.
Strum all the strings except the 1st & sixth string.
Visualizing the Dadd11 Chord:
- String 6 (low E): Mute
- String 5 (A): 5th fret (ring finger)
- String 4 (D): 4th fret (middle finger)
- String 3 (G): Open
- String 2 (B): 3rd fret (index finger)
- String 1 (high E): mute
Tips for Playing the Dadd11 Chord:
-
Finger Positioning: Keep your fingers curved and press just behind the frets for a clean sound. Ensure you’re pressing down firmly enough for each note to ring clearly.
-
Muted Strings: For a clean sound, avoid strumming the 6th (low E) & 1st (high e) strings. You can use the side of your thumb to mute these strings or simply focus your strumming on the 5th, 4th, 3rd, and 2nd strings.
-
Practice Clean Transitions: The Dadd11 chord is great for creating smooth, harmonic transitions, especially in folk and jazz progressions. Practice moving to and from other D-based chords like D major, Dsus2, and D7 to get comfortable with this shape.
-
Use in Chord Progressions: The Dadd11 chord adds an ambient feel and pairs well with chords like G major, A major, and Bm. Experiment with this chord to add depth and texture to your playing.
-
Strumming Technique: Strum with a light, even motion for a gentle sound, or try fingerpicking each string individually for a more delicate, atmospheric effect.
-
Experiment with Alternate Fingerings: Some players prefer using their pinky finger on the 3rd fret of the B string (instead of the ring finger) to free up their ring finger for additional transitions.
With these tips and finger positions, you’ll be able to add the Dadd11 chord to your playing with confidence, enhancing your music with its unique and expressive sound. Happy playing!

One thought on “Play Dadd11 chord | made easy with Tips”