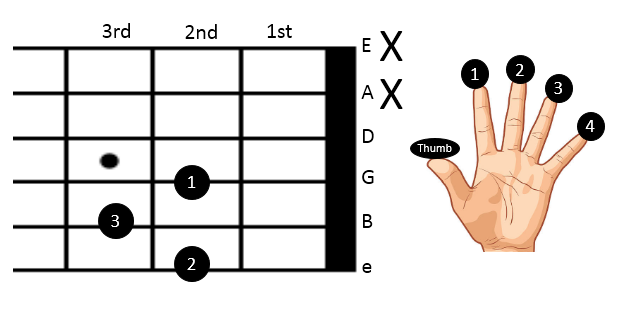
Here are some tips for playing the D Major chord on the guitar:
1. Finger Positioning
- Index Finger (1st finger): Place it on the 2nd fret of the G string (3rd string).
- Middle Finger (2nd finger): Place it on the 2nd fret of the high E string (1st string).
- Ring Finger (3rd finger): Place it on the 3rd fret of the B string (2nd string).
2. Strumming
- Only strum the top four strings (D, G, B, and high E). Avoid strumming the low E and A strings, as they are not part of the D Major chord.
3. Finger Pressure
- Press down firmly with your fingertips, not the pads, to avoid muting adjacent strings. Ensure that each string rings out clearly.
4. Hand Position
- Keep your thumb positioned at the back of the neck for better leverage. This will also help you press down the strings with less effort.
5. Practice Transitioning
- Practice transitioning to and from D Major with common chords like G Major, A Major, and E minor. This will help you build muscle memory and improve your chord changes.
6. Check Each String
- Play each string individually to ensure that all notes are ringing out clearly without any buzzing or muted sounds.
7. Use a Metronome
- Practice strumming the chord in time with a metronome to develop a consistent rhythm.
8. Relax Your Hand
- Ensure that your hand is relaxed. Tension can cause discomfort and affect your ability to play smoothly.
9. Experiment with Finger Placement
- Slightly adjust the angle of your fingers if you’re getting muted notes. Sometimes a small change in positioning can make a big difference.
10. Practice Daily
- Regular practice, even if it’s just for a few minutes a day, will help you get comfortable with the D Major chord and improve your overall guitar playing.
With consistent practice, the D Major chord will become second nature!
5 thoughts on “D Major Guitar Chord | made easy for Beginners”