Here are some tips to help you play the B7 chord effectively on the guitar:
1. Proper Finger Placement:
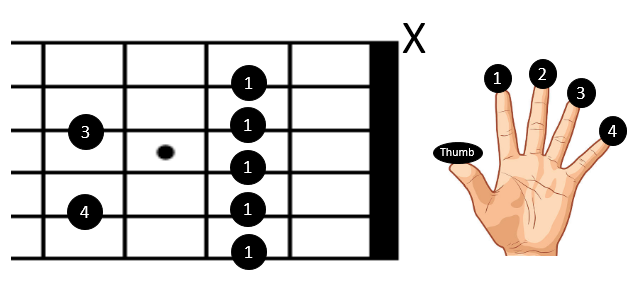
- Index Finger: Place your 1st(index) finger across all 5 strings of the second fret.
- Ring Finger: Place your 3rd(ring) finger on the 4th fret of the fourth string.
- Pinky Finger: your 4th(little) finger on the 4th fret of the second string.
- Strum all the strings except 6th string.
2. Ensure All Strings Ring Clearly:
- Press down firmly on each string with the pads of your fingers to avoid any muted or buzzing sounds.
- Make sure your fingers are curled enough so they don’t touch the adjacent strings, which can cause a muffled sound.
3. Strum the Correct Strings:
- When playing the B7 chord, strum only the top five strings (A, D, G, B, and high E). Avoid strumming the low E string as it’s not part of the chord and can make it sound muddy.
4. Practice Slowly:
- Start by practicing the chord shape slowly, making sure each string sounds clear when strummed. Gradually increase your speed as you get more comfortable with the finger placement.
5. Switch Between Chords:
- Practice transitioning between the B7 chord and other common chords like E, A, or G to improve your chord-switching speed and fluidity. This will help you integrate B7 into songs more smoothly.
6. Use a Metronome:
- Playing along with a metronome can help you keep a steady rhythm as you practice the B7 chord, especially when transitioning between chords.
7. Incorporate in Songs:
- Try playing songs that use the B7 chord. This will give you practical experience and make the learning process more enjoyable.
8. Finger Strengthening Exercises:
- Engage in finger strengthening exercises to improve your dexterity and make it easier to press down the strings for extended periods.
By following these tips and practicing regularly, you’ll be able to play the B7 chord with confidence and clarity.