3. Proper Finger Placement:
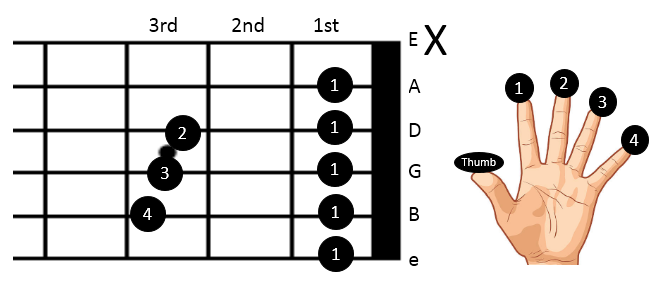
- Barre Chord (Root on 6th String):
- Index Finger: Press down all the strings on the 1st fret to create a barre.
- Ring Finger: Place it on the 3rd fret of the 5th string (A string).
- Pinky Finger: Place it on the 3rd fret of the 4th string (D string).
- Middle Finger: Place it on the 3rd fret of the 2nd string (B string).
- Strum from the 6th string (low E string) to the 1st string (high E string).
Build Finger Strength:
- Playing barre chords like A# major requires finger strength and dexterity. Regularly practice finger exercises to build strength and improve your ability to press down the strings evenly.
4. Check Your Barre Technique:
- Ensure your index finger is pressing down evenly across all strings. Adjust the angle and pressure of your finger to get a clean sound from each string.
5. Avoid Muted Strings:
- Make sure that none of the strings are muted unintentionally. Check each string individually by strumming and adjust your finger placement if necessary.
6. Use Proper Hand Position:
- Keep your thumb positioned behind the neck of the guitar for support and to help with finger reach. Maintain a relaxed grip to avoid tension.
7. Practice Chord Transitions:
- Practice moving between the A# major chord and other common chords like D# minor, G# major, and F major. This will help improve your chord-changing skills and muscle memory.
8. Use a Metronome:
- Practice the A# major chord with a metronome to develop timing and rhythm. This will help you integrate the chord smoothly into your playing.
9. Incorporate into Songs:
- Play the A# major chord in the context of songs or chord progressions. This will help you understand its musical application and improve your overall playing.
10. Stay Relaxed:
- Avoid tension in your hand and fingers. A relaxed hand will help you play more comfortably and reduce the risk of strain or injury.
By following these tips and practicing regularly, you’ll be able to master the A# major chord and use it effectively in various musical contexts.